 Here at Too Cool T-shirt Quilts, we love pushing the boundaries of T-shirt quilt design. First, we revolutionized the traditional rows-and-columns format with our signature puzzle style. Then, we upped the game with the stained-glass puzzle style, which added colored leading to highlight each piece.
Now, we’re excited to unveil the Flare Style T-shirt Quilt—our latest design breakthrough.
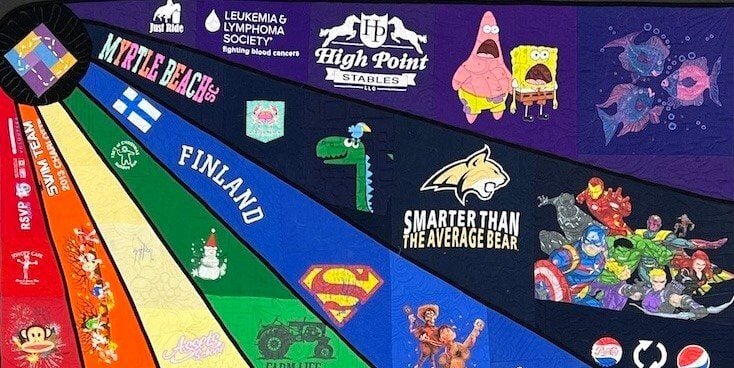
This bold style radiates energy, with T-shirts flaring outward from a point. The quilt you see here is our prototype, and we think it turned out pretty amazing!
 Table of Contents
What Makes the Flare Style Unique?
Key Design Elements
What to Know Before Ordering a Flare Style T-shirt Quilt
Examples
Could a Flare T-shirt Quilt Work for Your T-shirts?
Flare Quilt Pricing
Planning a Flare T-shirt Quilt
What You Can Expect From Us
Kathy loves her Flare T-shirt Quilt!
What Makes the Flare Style Unique?
The Flare Style quilt begins at a focal point placed in one corner of the quilt. From there, rays of T-shirt graphics spread outward, widening as they go. The prototype showcases a vibrant rainbow (in classic ROYGBIV fashion), but this design can adapt to other color schemes to suit your collection of T-shirts.
Key Design Elements Include:
 Dynamic Rays: Each ray starts small and expands as it moves away from a corner, creating a bold, dramatic effect.
- Color Coordination: Each ray is a solid color, showcasing T-shirts that fit into a specific hue. Mixing colors within a ray diminishes the overall impact.
- Graduated Block Sizes: T-shirts in each ray progress from smaller to larger blocks, maintaining the visual flow.
Back to the Table of Contents ↑
What to Know Before Ordering a Flare Style T-shirt Quilt
This style is not for every collection of T-shirts. Here are some important considerations:
 T-shirt Selection: Your T-shirts should lend themselves to a cohesive color scheme. While the rainbow theme is popular, other single-color or gradient themes work beautifully.
- Uniform Color Rays: Each ray should consist of T-shirts in the same color family, or the flare effect will be lost.
 Variety of Graphics: To create the graduated effect, your T-shirts must include graphics of varying sizes—from small to large.
- Customizable Corners: The focal point can be placed in any corner of the quilt, offering flexibility in design.
- Size Matters: Flare Style quilts work best in larger dimensions. The prototype is 72" x 90". We recommend a minimum size of 72" x 72". Smaller quilts lose the dramatic impact of the design.
- Premium Craftsmanship: This is one of our most complex designs. Each ray requires precise measurements, custom templates, and intricate assembly. As a result, Flare Style quilts are more expensive than our other designs.
Back to the Table of Contents ↑
Examples:
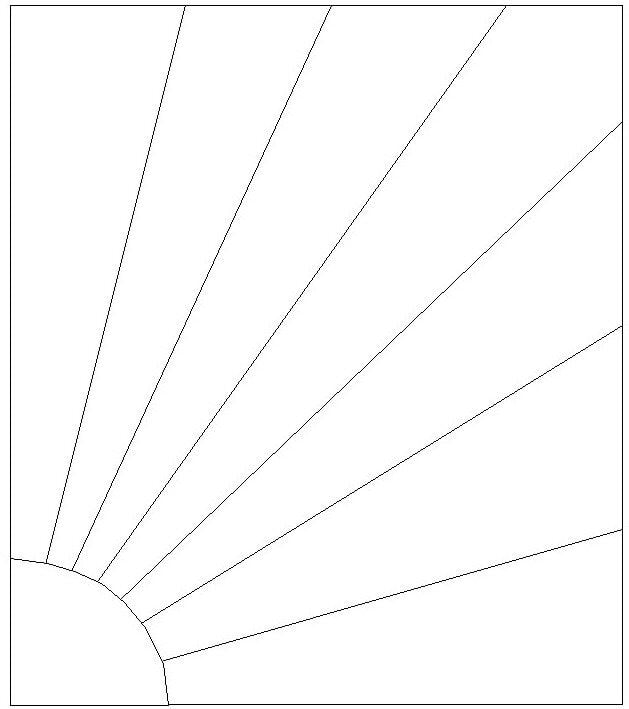
We begin with this drawing. We liked the feel of it, and we had enough gray T-shirts hanging around that we were able to translate the drawing into a quilt.


Next we drew a design with more colors people might find in their T-shirts. We used four different colors and white.


Back to the Table of Contents ↑
Could a Flare T-shirt Quilt Work for Your T-shirts?
We’ve included a few examples to spark inspiration. If you’re interested, let’s discuss whether this innovative style is the right fit for your collection!

Flare Quilt Pricing
There are limited quilt sizes for the Flare Quilt due to it's design considerations.
Standard Quilt Sizes:
Full Size - 84" x 92"
Queen Size - 92" x 100"
The smallest size quilt we will make is 72" x 72", the largest size is 92 x 100.
Calculate the Price of Your Quilt Based on Size
Back to the Table of Contents ↑
Planning a Flare T-shirt Quilt - Step-by-Step
1. Look at Your T-shirts
 Not every group of T-shirts is right for a Flare style T-shirt quilt.
How Many T-shirts? Each Flare quilt has 7 rays. Each ray uses between 5 and 8 T-shirts. The larger the quilt, the more T-shirts each ray can have.
What Type of Material Can You Use? For this style of quilt, we would like the materials limited to sweatshirts and T-shirts. We can use tech fabrics.
2. Divide T-shirts Into 7 Piles
 Next divide your T-shirts into 7 piles of same colored T-shirts.
Look at each pile and make sure that there is no huge color jump between T-shirts. There will be some minor color shifts - that's ok. It's the major color jumps that will be distracting.
In the photo here you see some color shifts in the light blue ray. There are some jumps, but I think it is within an acceptable range - for me.
You might be willing for a larger step or would like less of a step in your quilt.
3. Look at Each of the 7 Piles One at a Time
Look at each of the logos - front and back if you have them. Lay them out by image or graphic size. Big to little. Make sure that each pile has gradient of design sizes. We can use the fronts and backs. So you might have a large graphic on one side and a small one on the other side. We will slit the graphics when we cut the T-shirts.

If there is a logo you don't want, X it out with masking tape. We will use the other logo on the T-shirt. For each pile of T-shirts, stack the designs from big to little. Again, we will split up shirts with 2 graphics.
4. Decide Which T-shirt to Use in the Corner of Your Quilt
You many know exactly which T-shirt you want for the corner. Or you may not. Here are some considerations.
- The corner block should be a different color than any of the rays.
- The graphic on the T-shirt should be no larger than 14" x 14". Something smaller can work well. See the pig here.
- The top of the image will be angled 45 degrees to the right from the corner. The examples here show this orientation.
- Clearly make this T-shirts say your corner block.


5. Decide Where Each Color Will Go

Next you need to decide where each color group will go. Below we have a blank map you can print out to play with your color options. These are PDF's. Click on the options you like to open the worksheet map into a new window. Then print.


When you are set with your color set up, print out a new map. Complete this map with the following information....
- Write at the top of the paper - "Top."
- Write each color into a ray.
- Write a number in each ray so you can mark your stack of T-shirts with that number.
 6. Stack Up Your T-shirts Into Separate Pile
When you stack up your T-shirts, you can write that number on each grouping. Most people will put each grouping in a separate shopping bag or tie up with sting.
If you can, put your T-shirts into a large to small graphic order if you can. That way we can work from the top to the bottom of the stack of T-shirts.
7. Print Out the Order Form
The order form for the Flare quilt is different from or other order forms. Please click the link here to be directed to the order form.
8. Box Up And Ship Out Your T-shirts
Here's an article about you to box up your T-shirts.
Back to the Table of Contents ↑
What You Can Expect From Us
 1. We will let you know when your box arrives at our shop.
2. We will look at your T-shirts before we begin the project. We will then confirm that your T-shirts are a good fit for a Flare quilt. If not, we will let you know. We don't want to disappoint you, so we will be honest and up front before we begin working on your quilt.
3. We will give you an expected timeline as we get started. Typically we are 6 to 8 weeks.
4. If at any point during the quilt making process we have questions, we will stop and ask you.
5. If you have any questions, we will be here to answer them.
Back to the Table of Contents ↑
Conclusion — A Fresh Take on T-shirt Quilts
The Flare quilt brings something truly unique to the world of T-shirt quilts. It’s exciting to break boundaries and offer a design that stands out in such a bold way. If you’re ready to transform your T-shirts into a quilt that’s as extraordinary as your memories, we’re here to help you make it happen.
